For most adventurers on the road, the van’s windows are less than ideal for concealment and insulation, and require additional coverings for a more comfortable living environment. Today, VannCamp helps answer some of your doubts about window shades and shows you how to DIY magnetic window covers for vans.
Why do we need the window covers?
Benefit 1: Window covers can block out light. When you sleep in the van, you should have encountered the situation that you can’t sleep for a long time because the light is too bright or the sun is blinding early in the morning. At this time, the van window covers can help you to avoid it very well.
Benefit 2: Window covers provide complete privacy. It may be that your windows already come with black decals, but they still don’t achieve complete coverage. Imagine how embarrassing it would be to accidentally realize someone is staring out the window while you’re breastfeeding. However the window cover can completely protect your privacy and prevent this situation from happening.
Benefit 3: Window covers regulate the temperature inside the van. In the summer, the window covers will lower the temperature inside your van when sun is blocked. Window shades with reflective fabrics and insulation can even lower the temperature by 30°F (the data can’t be standardized, it has more to do with the overall insulation of the van and other factors such as the length of exposure to the sun). In winter, the insulation of window shades will reduce heat loss inside the van and keep the temperature inside the van stable (provided that the van’s body is also well insulated to have a more noticeable effect). It will keep your van as warm in winter and cool in summer as possible and have a comfortable condition.
Benefit 4: Window covers can slow down the aging of the van’s plastic parts and seat leather. The high temperature and strong UV rays in summer can easily accelerate the aging of the interior plastic trims and leather cushions, so the window shade’s light-blocking and temperature-regulating functions can well slow down the aging of the van’s interior parts.
Benefit 5: Window cover can reduce noise. When you are camping outdoors for a lunch break, is not woken up by the sound of birds chirping outside. The window covers can reduce the noise of the external environment into the van, to provide a quieter and more comfortable environment for you.
Van Window Cover Types
Before we DIY window covers, let’s see what are the common types of van window covers:
1. External Cockpit Window Cover

This window cover design offers complete exterior coverage for the van’s windshield and front door windows. It’s a fantastic option, but creating it yourself might be challenging. The large size of the fabric needed and the precision required for cutting and sewing make DIY construction less recommended.
2. Full Van Covers

While this offers the most effective protection, it’s also the most demanding to install. Setting it up might require a ladder and often exceeds 10 minutes. This cover is ideal for long-term parking and safeguarding the entire van. As you might expect, the high production standards involved make DIY a less-than-ideal solution.
3. Horizontal Curtains
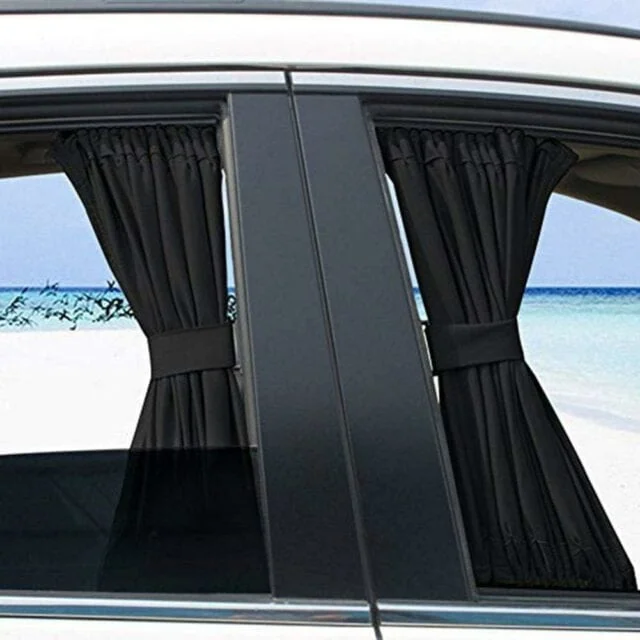
These covers offer some shade, but their temperature regulation capabilities are minimal. Although it is easy to make, it is also not a good choice.
4. Magnetic Window Covers
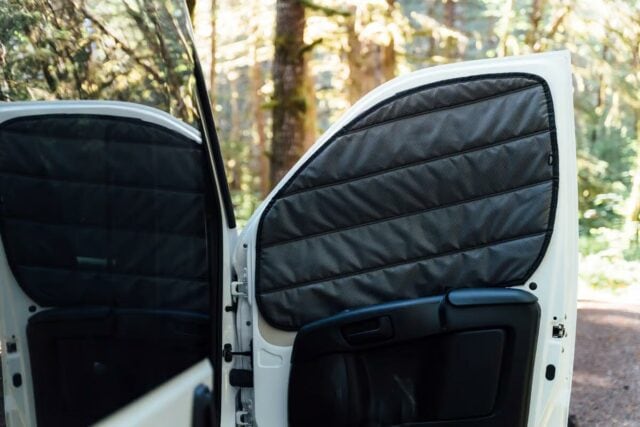
This kind of window cover is designed to be installed in the van, with magnets sewn around its perimeter, allowing it to easily attach to the metal window frames of the van. It’s easy to install and remove, and insulating materials can be used to get effective thermal insulation. Additionally, it is moderately difficult to make. Therefore, we strongly recommend this type of DIY van window cover.
DIY Magnetic Window Covers for Campervan
Prepared Materials
- Markers
- Newspaper (required) / cardboard (optional)
- Aluminum Foam Insulation – Reflectix (Reference link: amazon.com)
- Your favorite fabrics
- Lots of rare earth magnets (Reference link: amazon.com)
- 3M Velcro or small iron pieces with 3M adhesive (for plastic frames)
- Sewing machine
- Window Screen (optional, for making a vent window covers with bug screen ) (Reference link: amazon.com )
- 3M Thinsulate (optional, for better insulation)
DIY Process
Step 1: Measure the size of the window frame
The correct size is more important for window cover. It will not only minimize the sunlight, but also allow the magnet to fit the window frame better and perfectly.
There are several measuring methods, such as precise measurements with a tape measure or tracing the window frame shape with a piece of fabric.
The easiest way is to use newspaper. It’s easy to gather old newspapers around you. Lay the newspaper flat inside the window frame and tape it up. Use a marker to draw an outline on the newspaper,then cut off the excess .
Then, we have a template of the same size as the window.
Note: Since newspaper is very fragile, it’s advisable to use extra tape and handle them carefully to prevent tearing.
The best way to do this is to replace the molded newspaper with cardboard. Stick the newspaper with the window shape onto the cardboard and then cut the cardboard along the edges of the newspaper into the shape of a window as well. This way the cardboard is able to be used in the next step of cutting the foam and fabric, reducing the risk of the newspaper breaking or warping. Of course you can also use just newspaper, but you must place it carefully to avoid warping.
Step 2: Cutting the insulation
The following tutorial will be based on cardboard.
Normally, we use materials with aluminum foil as the reflective insulating layer. The window covers we sell utilize XPE insulation with aluminum foil reflection. However, this specific material may not be readily available in online stores in the US, so you can opt for Reflectix as a slightly less efficient alternative. Additionally, in order to enhance the insulation performance of the covers during winter, we can add some extra insulation layers, such as the multiple layers of 3M Thinsulate used in our AllSeasinGuard Pro product. Of course, adding additional layers of insulation also improves the ability of the covers to block out the cold air in the van during the summer.
Cutting Reflectix
Tape the molded cardboard to the reflectix foam, draw a line along the edge of the cardboard with a marker, and then cut out the same size of reflectix foam in a 0.5cm-1cm circle along the line.
Note: When cutting, it’s important to trim extra material around the edges because we’re making foldable shades. There will be multiple closely spaced seam lines in the middle for folding, which may cause some shrinkage in these materials. For large windows like windshields, the extra length should be around 2cm; for the window of front and rear doors, it’s about 0.5cm-1cm. The longer the window, the more seam lines and the greater the shrinkage.
This principle should also be followed when cutting the additional layers of 3M Thinsulate padding and fabric in the subsequent steps.
Cutting the 3M Thinsulate layer
Since 3M Thinsulate is soft, it needs to be pinned to the edge of the cardboard. Following the principle above, cut the 3M Thinsulate insulation layer along a circle 0.5cm-1cm or 2cm out from the edge.
Step 3: Cutting the fabric
It’s similar to cutting the 3M Thinsulate fabric in step 2. If you are using 3M Thinsulate as additional insulation, we recommend using a fabric with a waterproof layer to prevent water vapor from entering.
Step 4: Sewing the fabric and insulation foam together
We fold the layers of fabric, insulation foam and 3M Thinsulate in the correct order (3M Thinsulate on the side facing the inside of the van, Reflectix on the side facing the outside of the to reflect the sunlight), align the edges and pin in place.
Sew around the edges of the cover first, then sew the desired number of folding seams based on each part.
Here are the folding seam counts for our products, for your reference:
Windshield cover: 8-10 seams ;
Front door cover: 3-4 seams ;
Sliding window cover: 4 seams ;
Rear door window: 4 seams .
Tips for Aftermarket Windows
Our sliding window and crew window may be using windows from brand such as CRL/AMA/VWD. Then we can make some small changes to the cover to better fit these windows.
For example, the CRL window has two small windows at the bottom that open outward, we can cut a seam in the middle of the lower part of the cover.This allows the left and right sides to fold upwards separately, facilitating ventilation through the window openings. Of course, we need to sew magnets on the surface of the inward-facing cover to catch the upward-folded portion.
For AMA or VWD windows, which slide open left and right, we need to leave a foldable seam in the middle of the cover. This enables us to open the windows without removing the cover. Therefore, we also need to sew magnets onto the top edge of the cover so that it can attach when flipped over on one side.
Tips for covers with bug screen
For windows that require ventilation, such as front door windows, sometimes we wish to maintain privacy while allowing airflow. For this purpose, we suggest sewing horizontal fold lines across the front door window cover, starting from the top and going down about one-third of the way. This way, we can fold down the upper part of the cover along these fold lines to achieve ventilation.
However, this raises another issue—what if mosquitoes or other small insects fly or crawl in? Our recommendation is to add an extra layer of mosquito netting to the cover. This not only addresses the ventilation issue but also mitigates the annoyance of insects. Of course, the edges of the mosquito net should also be sewn with magnets.
Step 5: Check the size
We test-fit the sewn cover on the window to ensure a good fit.
Step 6: Sew the magnet
The windshield cover doesn’t need magnets around its edges, but you can place magnets at the cutouts for the rearview mirrors; other parts of the window will need magnets sewn in.
In order to fix the magnets, we need to sew some special pouches for magnets, each pouch contains 1 magnet. Then sew this bag to the cover. Note that in order to maintain a strong attraction, it is recommended to have no less than 4 magnets per side.
If your window frame is not metal, it doesn’t matter, we can use 3M adhesive tape to stick the small iron pieces on the frame so that the magnets will be able to attach to it, but please make sure that the position of the small iron pieces and the position of the magnets are aligned.
Another solution is to sew Velcro all around the cover and on the plastic window frame, which will also allow the cover to stick to the window. I don’t recommend this method, though, for two reasons. One is that over time the Velcro may lose its adhesive properties if it is torn too many times, and the other is that the adhesive strength of Velcro isn’t very high, only suitable for lighter covers.
Step 7: Stitching the edges of the cover with welt
To make our cover more beautiful, it is better to sew the edges of the cover. It will also help the cover to be more durable and less likely to be torn.
This concludes the tutorial on how to make a DIY magnetic campervan window cover. If you follow the tutorial step by step, you should be able to make the cover of your needs, but of course it does require a bit of time.
Our store also sells ready-made insulated magnetic window covers. The SummerShield Lite version uses waterproof coated fabric, 5.5mm double sided aluminum foil XPE insulation, while the AllSeasonGuard Pro version adds an additional three layers of 3M Thinsulate insulation, making it an excellent choice for you. For more detailed information please check out this article.